Important! This is to be used as a general overview only. Possible options make it impossible to cover every aspect. The operating manuals that came with your equipment should be read first including any safety items.
GENERAL POOL OPERATION GUIDELINES
- Important – The water level inside the pool should always be greater than the ground water outside the pool – this is true regardless of the type of construction.
- Never drain a swimming pool unless advised to do so by a qualified pool professional. Almost all repairs and water quality problems can be fixed without draining the pool.
POOL CARE:
Pool Care falls into five categories. A clean clear pool requires:
- Circulation
- Filtration
- Cleaning
- Water chemistry
- Testing
POOL ANATOMY
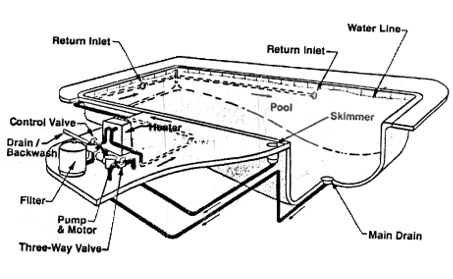
The first thing you need to know is how a pool functions. Refer to the diagram below to develop an understanding of how a pool system is designed to operate.
NOTE: The information presented in this section is not intended to depict all pools. We understand that pool design and plumbing methods vary widely. Accept this information on the basis of understanding an average pools operation system.
The pool equipment and plumbing are designed to keep water moving. The suction-side of the system pulls the water from the pool to the pump. The pressure side of the system delivers the filtered (and sometimes heated) water back to the pool.
- Circulation: is provided by the main pool pump. Water is drawn out of the pool thru the bottom drain or the side skimmer. The water is then forced thru the filter media then back to the pool, possibly passing thru a heater or chlorinator. The pump should operate (on average) 12 hours. Ideally, operate your pump 24 hours per day. THE MOST IMPORTANT THING TO KEEP IN MIND IS THE POOL WATER MUST CIRCULATE COMPLETELY AT LEAST ONCE DAILY. A general guideline for this is to check out the GPH (gallons per hour) of your pump. If you can figure out the gallonage of your pool, figure out how many hours the pump must run to fully circulate the pool. Regularly check the pressure at the filter and the flow back to the pool. Check to see if the pressure is 10-12 lbs higher than when the filter was clean or if the flow appears reduced. This would indicate it is time to clean the filter. Refer to your filter guide for specific directions on how to do this.Regularly check the baskets at the skimmer and pump for debris. If necessary, shut off the pump and remove these for cleaning. Often when you first start your pump or when the basket is removed from the pump it will be necessary to re-prime the pump before restarting. This process requires removing the pump lid and adding water to the pump, replacing the lid and restarting the pump. Usually, all valves can be left in their normal operation position. The pump may require 2-3 minutes to work the air out of the lines.
- Filtration: A filter removes particles that can cloud the water and compete for your sanitizer’s attention. Refer to your filter guide for information on how to clean the filter.
- Cleaning: Vacuuming and brushing the pool surface helps to prevent many problems. Even with the use of automatic cleaners, it is recommended that you regularly brush the pool surfaces Algae and bio-film can cling to the surface and make a starting point for algae and other possible problems. For most pools the procedure to manually vacuum the pool is as follows: First, the pump should be started and the filter cleaned. (Refer to your filter and pump guide if necessary). Next, attach the vacuum head to the pole, then attach the vacuum hose to the head (if the hose has a swivel cuff at one end, care should be taken to attach the swivel end to the vacuum head. Set the head into the pool. At this time the vacuum hose needs to be filled with water. This can be accomplished in a couple of ways: Either grab the hose where it comes from the vacuum head to the surface , then continually push the hose under water until you reach the loose end or hold the loose end over one of the returns (with the pump running) until all the air is forced out of the hose. Hold your palm over the free end (to keep the hose full of water) and pull it to the side skimmer. Remove the skimmer lid, set the “skim vac” over the basket and attach the hose to the “skim-vac”.Note that you may or may not have a “skim-vac” (it looks like a shallow funnel, it’s the main purpose is to allow debris to get caught in the basket at the skimmer, which is often easier to clean. Also be aware that on some pools it is necessary to push the hose thru the skimmer opening (in this case the “skim-vac” will most likely have an elbow ). Some older skimmers do not have a “skim-vac” or other vacuum plate and were designed to attach the vacuum hose to the bottom of the skimmer or could be connected to a side wall suction port, bypassing the skimmer altogether. The last method is most commonly seen on pools with gutters (no skimmers) and sometimes on pools without a bottom drain.At this point, water should be flowing thru the vacuum head & hose, thru the pump into the filter and back to the pool. Some air may have entered during the hookup step and may have to work its way thru the system. Because most pools have more than the side skimmer providing water to the pump and because the pump will find it easier to get water from these sources than to draw water up thru the vacuum hose, it will most likely be necessary to restrict or stop the water from these other suction lines in order to provide proper suction at the vacuum head. Try moving the vacuum over debris. If too little suction is present check to see that the pump didn’t loose it’s prime. Reprime the pump if necessary or start to turn off lines feeding the pump (other than the line the vacuum is attached to, this line needs to be fully open) until the suction is adequate to catch the debris. Conversely if too much suction is present, it makes it difficult to move the vacuum head. Open any suction lines that allow the pump to get additional water. “How much” is often a matter of personal preference. Too little suction can make the task of cleaning the pool slow and tedious whereas to much can make moving the vacuum head a feat requiring some strength.
Once regulated to your liking, the vacuum is moved methodically over the pool floor lifting debris that will catch in the baskets and filter. After a while, the baskets may become filled and/or the filter may become dirty, reducing water flow making it difficult to vacuum. You will have to stop the pump, remove the vacuum hose connection, clean the baskets and filter, then start over. If only a light amount of debris is present, you may be able to clean the entire pool in one cycle. If a large amount of debris or algae is present may require several cycles. If the later is the case, there may be a more practical approach. Many filters have 6-way valves that allow you to pump water from the pool directly to waste by placing the valve in the waste or drain position. Important: do not confuse the waste/drain position with the backwash position. Never vacuum a pool while the filter is in the backwash position. Also, be aware while vacuuming to waste that you are removing water from the pool at a rapid rate. It is helpful to start with a pool overly full and keep the source water hose adding makeup water as you proceed. This method is best used to remove approximately 70% of the debris from the worst areas, then switch back to normal procedures to finish up. It allows you to save time in cases where it would be necessary to stop to clean the filter several times. This procedure can also be used when the debris is so fine that the filter is having trouble catching it and is being returned to the pool. Some types of algae fall into this category.
- Chemistry: Adding the proper products at the right time helps to prevent corrosion, scale, algae, bacteria problems and helps keep water clear, clean, attractive and safe. Review the Water Treatment page for more specific guidelines concerning water chemistry.
- Testing: Testing helps tell us what chemicals to add to maintain proper water chemistry. Proper water chemistry helps to prevent disease, protects the pools surfaces, equipment and provides sparkling clear water.Sanitizers are added to the water to control the growth of disease-causing bacteria. Two families of products are used to accomplish this task. Halogens are the most common. Chlorine and Bromine both fall into this category, with chlorine being the most common. Chlorine is also a powerful oxidizer and is often used as a shock or Burnout® to help rid the pool of perspiration, oils, and contaminants too small for the filter to remove. The second group is called Biguanides. Biguanides are polymer compounds that disrupt the cellular activity of bacteria.These compound are found in non-chlorine products like BioGuards Softswim ® program.It is important to note that many products are not compatible and mixing them can be dangerous. Consulting with the knowledgeable chemistry people at Spartan Pools can help you to select a program that best suits your needs and to help balance cost with convenience and ease of use.
All of our programs use a 3-STEP approach to producing safe clear inviting water. Before starting a 3-step program be sure to have your water properly balanced. This sets the stage for your program to work properly and it prevents corrosion and scale from damaging your pool and equipment. The PH, alkalinity, calcium hardness and temperature all have an effect on the pool’s tendency to be corrosive or scale forming. This 3-STEP approach always starts with sanitizing to prevent bacteria. The second step requires oxidation to clarify the water. Finally, add an algaecide to help prevent unsightly algae.
The water should be tested 3-4 times a week for the variables that can change quickly (ph, total alkalinity, and oxidizer levels) plus have a complete workup after your initial fill or spring start up, then 2-3 times during the summer and again prior to fall closure. This complete testing is done by bringing a sample of your pool water into Spartan Pools, Inc. where our lab testing includes tests for those elements that do not readily change and therefore do not need to be tested as frequently. There is no charge for this in store testing.
Our hope is to educate our customers so that pool care is easy and problems are few. Our pool care guide, equipment guides, and store personnel are all valuable tools to further your education. Also each spring we sponsor a “Pool School” where customers learn and ask questions. Should a problem arise, you may need to provide information about your equipment type, brand, and model numbers. It is a good idea to organize all your literature in a common folder.

